Editing a backup task
The destination path is displayed towards the top of the program center window. It can be a local
path, a network path or a directory on an FTP server.
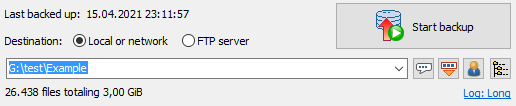
 Destination (local or network)
Click on the button on the right of the entry field to select a directory
anywhere on your computer or on your network or edit the path manually.
Clicking the down arrow at the right of the entry field will drop down a list
of recently-used destination directories for quick selection. Right-clicking
this field will open a menu for editing this list.
It is also possible to insert placeholders for date and time into the path
and to replace the drive letter with the volume name of a removable drive
(e.g. a USB stick).
If you need a special account to access the destination directory, click the
button and enter the username. If also a password is specified, this will be encrypted
and saved in the task file. The connection to the backup directory will be made
automatically. If no password is specified, the user will be prompted to enter
the password for each backup.
When using USB sticks or external drives as backup destination, the system may
not always assign the same drive letter.
To be independent from drive letters when backing up data, you can use
the volume specifier of the removable media (:<volumename>:) instead.
Example: instead of K:\Backup use :Backup-1:\Backup
On backing up, the program will check whether a medium with the specified volume name (regardless
of the assigned drive letter) is connected. If not, the user will be prompted
to insert it.
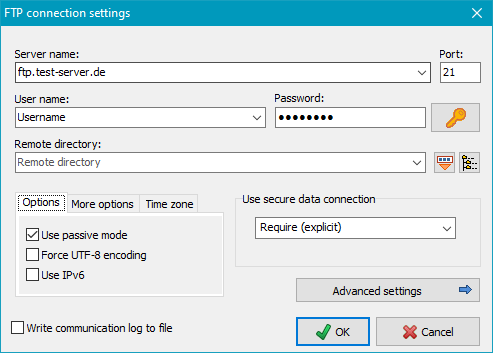
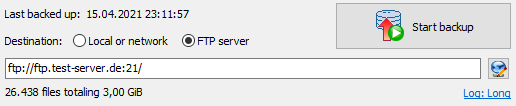
If you select a destination on an FTP server, the server's name, port and the remote
directory are displayed. Click the button at right to specify or edit the
required connection settings.
General settings:
- Password: Click the button at the right to enter a fixed password
which will be used to establish the FTP server connection automatically.
If you leave the password blank for greater security, you must manually enter
the password each time on starting the backup.
- Destination directory: The destination directory can be specified manually
or, if the connection data (server name, username, etc.) are correct, selected in a dialog
after clicking the button .
It may contain one or more placeholders for date and time which can be
selected from a list by clicking
 .
If a password is specified in the dialog, the connection to the FTP server will
be established automatically.
.
If a password is specified in the dialog, the connection to the FTP server will
be established automatically.
- Secure data connection: Data transfer
is encrypted using TLS/SSL (FTPS):
- None: All data will be transferred unencrypted.
- If available (explicit): On connecting, the server will be interrogated
as to whether it supports TLS/SSL. If so, the data transfer
will be encrypted (explicit method), otherwise unencrypted.
- Require (explicit): It is expected that the server supports
TLS/SSL (explicit method). If not, the connection will be canceled.
- Always (implicit): All data transfers
will be encrypted using the special port 990 (implicit method). If the server
does not support this method, then connection will fail.
For a secure connection the option Require is recommended.
The FTP server must support one of the TLS versions 1, 1.1 or 1.2
(more infos).
- Options:
- Use passive mode: Using passive mode, the server will
define the port for data transfer, otherwise the client will define this.
- Force UTF-8 encoding:
Some servers support a file transfers using
UTF-8 encoding,
but do not announce this capability after establishing the connection.
This is inconsistent with the specification of
RFC2640 Section 3.2
but in this special case you can force the encoding of the client side to UTF-8
by checking this option.
If, in addition, the server must also be switched to UTF-8, use the option
Send OPTS command for UTF-8 described below.
- Use IPv6: Some servers require a connection using the
IPv6
protocol. Click this option to switch to the IPv6 address mode.
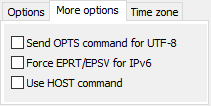
- More options:
The following options (see screenshot above right) are only required if problems
arise from the FTP connection
(see here).
Unfortunately the available servers do not all follow the recommendations (RFCs) for the
FTP protocol
consistently. The following options are a workaround for these shortcomings.
- Send OPTS command for UTF-8:
A server supporting UTF-8 must inform the client about this after establishing
the connection and automatically switch to this mode (see
RFC2640 Section 3.2).
Unfortunately there are servers indicating the support of UTF-8, but nevertheless requiring
an OPTS command to enable it. If this is the case, this option must be selected.
- Force EPRT/EPSV for IPv6:
If the connection to the FTP server was established using the IPv6 protocol (see above),
the data transfer usually requires the EPRT and EPSV commands, instead of
PORT and PASV used for IPv4. By default, the server should inform the client
about this in reply to the feature request (FEAT command). Unfortunately
there are servers that do not follow this recommendation. If this is the case, you must
switch over to this manually by clicking this option.
- Use HOST command: Many Internet providers use the
same FTP server IP for all users. The HOST command is used to assign
the user's server space.
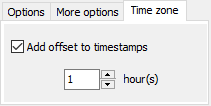
- Time zone
On time-zone spanning FTP connections it is sometimes necessary to adjust the
time offset manually for reliable timestamp comparisons.
- Write communication log to file:
For debugging purposes, communication with the FTP server can be logged.
This option will not be saved permanently.
The log is written into the file PbFtp.log located in the same directory
as the other log files (see here).
Use the Action menu to view or delete this file.
Clicking the Advanced settings button will open the following page.
Advanced settings:
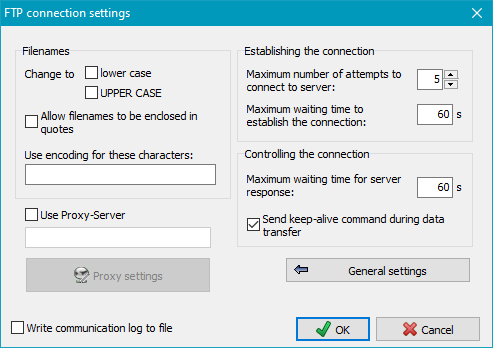
- Filenames:
- Change to lower/upper case: Unix/Linux systems differentiate
between lower- and upper-case characters in filenames.
You can specify whether you wish to change all file and directory names to lower
or upper case prior to data transfer.
- Allow quoted filenames: Filenames with spaces will cause
errors on an FTP transfer. Some servers allow filenames within quotation marks
(as is common under Windows).
- Character encoding: As there are still FTP servers that do not support UTF-8 encoding,
you can specify that certain characters are to be replaced by a numeric code
as is usual in URL addresses (e.g. a space = %20).
- Use Proxy server: If a proxy gateway is required to
connect to the FTP server, you can specify the desired settings here.
- Establishing the connection:
- Maximum number of attempts: Specify the maximum
number of attempts to connect to the FTP server. If this fails, the
backup will be canceled.
- Maximum waiting time to establish the connection: Specify the maximum time
to wait for a reply from the FTP server after sending the connect command.
If establishing the connection fails, further attempts will be made until
the maximum number is reached (see above).
- Controlling the connection:
- Maximum waiting time for server response: Specify the maximum time
to wait for a response from the FTP server after sending a command.
- Send keep-alive command during data transfer: With some FTP servers or
firewalls it can happen that during lengthy data transfers the control
channel will be closed due to inactivity. Enabling this option, a small
data packet will be sent periodically to prevent this issue.
You can find more information about FTP on
Wikipedia.
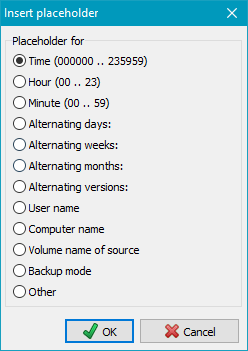
Different placeholders in the format %sss% can be added to the destination path
to be replaced with current values on backing up. You can insert a placeholder manually into
the path or select it from the lists opened by clicking the button
(see to the right).
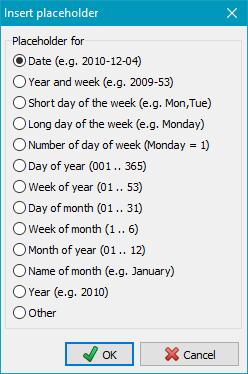
The following placeholders are available:
- %date% - Date in the format "yyyy-mm-dd" (e.g. 2010-12-04)
- %yaw% - Year and week in the format "yyyy-ww" (e.g. 2009-53)
- %dow% - Short day of week in the format "Mon, Tue, Wed, Thu, Fri, Sat, Sun"
- %ldow% - Long day of week in the format "Monday, Tuesday, etc."
- %dnw% - Number of day of week (Monday = 1, ..., Sunday = 7)
- %day% - Day of year in the format "ddd" (e.g. 1 = January 1)
- %week% - Week of the year in the format "ww" (i.e. 01 .. 53)
- %dom% - Day of month in the format "dd" (i.e. 01 .. 31)
- %wom% - Week of month in the format "w" (i.e. 1 .. 6)
- %month% - Month of year in the format "mm" (i.e. 01 .. 12)
- %lmonth% - Name of month in the format "January, February, etc."
- %year% - Year in the format "yyyy" (e.g. 2010)
- Other - Will switch to the secondary list at right
- %time% - Time of day in the format "hhmmss" (e.g. 215325)
- %hour% - Hour in the format "hh" (e.g. 17)
- %minute% - Minute in the format "mm" (e.g. 43)
- %d#n% - n (= 2..366) Alternating days: inserts the number of the day of the year modulo the
specified number n (e.g. %d#2% is replaced by 1 on odd days of the year, by 2 on even days)
- %w#n% - n (= 2..53) Alternating weeks: inserts the number of the week of the year modulo the
specified number n (e.g. %w#4% is replaced by 1 in the weeks 1,5,9,..
of the year, by 2 in the weeks 2,6,10,.., by 3 in the weeks 3,7,11,..
and 4 in the weeks 4,8,12,..)
- %m#n% - n (= 2..9) Alternating months: inserts the number of the month of the year modulo the
specified number n (e.g. %m#3% is replaced by 1 in the months 1,4,7,10, by 2
in the months 2,5,8,11 and by 3 in the months 3,6,9,12)
- %v#n% - n (= 2..99) Alternating versions: inserts the number of the backup modulo the
specified number n (on each completed backup the number will be increased by one -
e.g. %v#3% will be replaced by 1 on 1st, 4th,7th,
by 2 on 2nd, 5th, 8th and by 3 on 3rd, 6th, 9th backup). To reset
the counter, use the function in the Backup task menu.
- %username% - Name of the logged-on user
- %computername% - Name of the computer
- %volume% - Volume name of source (only available if
all source directories are on the same drive)
- %mode% - Backup mode (Updt,Full,Diff or Incr)
- Other - Will switch to the primary list at left
Placeholder for Windows environment variables: In addition you can use any
Windows environment variable as part of the destination path.
Insert the placeholder %evar(<name>)%
manually. The expression inside the brackets (<name>) should be replaced
by the name of the environment variable, e.g. %evar(HOMEPATH)% or %evar(TEMP)%.
Example: X:\Backup\Data-%date% ⇒ X:\Backup\Data-2004-10-17
Hence another backup directory will be generated each day.
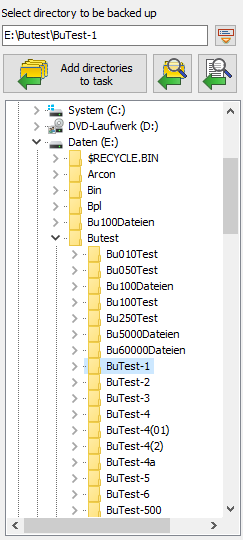
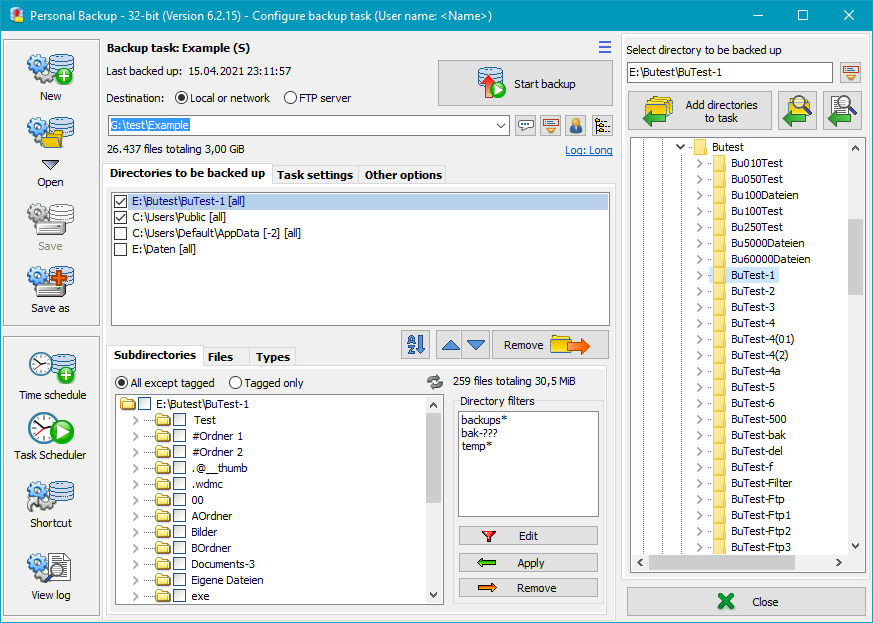
Add directories
Next, select the directories to be backed-up. Click on the Directories
tab and select the desired directories you wish to back up. If you select only one directory, it
will be displayed in the upper field and can be added directly to the task by
clicking the button.
If you select more than one directory (possibly from libraries),
after clicking the button these will be displayed as a list prior to being added
to the task. You can check and optionally deselect individual directories.
A click on the OK button will add the directories to the task one after the other.
 If you wish to inspect the files contained in the selected directory, click this button.
The dialog box option Show files allows you to display a file list, but you can select
only one directory.
If you wish to inspect the files contained in the selected directory, click this button.
The dialog box option Show files allows you to display a file list, but you can select
only one directory.
 If desired, you can select one or more files from a directory directly for backup.
Clicking the button will open a dialog to select the files.
Then the program will automatically make all required settings:
If desired, you can select one or more files from a directory directly for backup.
Clicking the button will open a dialog to select the files.
Then the program will automatically make all required settings:
- The directory containing these files will be added to the backup task.
- All subdirectories will be excluded from backup. They are not displayed in
tree view.
- The file filter will be set such that
only the selected files will be backed up. By clicking the button provided
this selection can be changed afterwards.
- The selection of file types will be disabled.
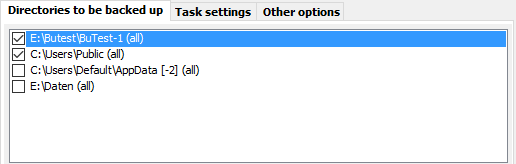
The names of all selected directories will be added to the task list in the center.
Long names will appear abbreviated in the task directory list such that the beginning
and end of the path will remain visible. Moving the mouse over a such a name will
display the full path as a tool-tip.
The checkbox  on the left can be cleared by clicking to exclude the selected directory
from backup temporarily without removing it from the list. If you wish
to resume the backup for this directory just click the checkbox again.
on the left can be cleared by clicking to exclude the selected directory
from backup temporarily without removing it from the list. If you wish
to resume the backup for this directory just click the checkbox again.
After each directory name, additional info is displayed in an abbreviated form to
indicate the subdirectories selected and any filter
settings for file and file types:
- [F]: Individual files from a directory were added for backup
(see more).
- (-n): There are n
subdirectories excluded.
- (+n): There are n
subdirectories selected.
- (all): No file filter has been specified.
- (only {filter}): A file filter {filter} (e.g. [AB]*) has been specified
to select certain files
(See Standard file filter)
- (except {filter}): A file filter {filter} (e.g. [AB]*) has been specified
to exclude certain files
(See Standard file filter)
- (from/to date/time span): A time slot
has been specified under the Files tab.
By default, the modification time is used as reference. Optionally the
creation time or both can be selected - displayed by [C] or [B].
- (U): Only files that were created or modified after the time of the
last backup of this task
- (</> size): Only files matching a
predefined size (e.g. <16MB or >1kB)
will be backed up.
- [+/-attr]: Certain attributes
(e.g. [+a-r]) will be included or excluded.
- [I]: A type list
has been specified via the option "Only these" under the
Types tab.
- [E]: A type list
has been specified via the option "All except" under the
Types tab.
Clicking one of the listed directories will display
the tree of all subdirectories or, dependent on the user's selection, the
file filters or file types in the program bottom window
(see more). Doing this click for the
first time after opening the task, will additionally scan all these subdirectories
for new and changed files and update the display for file count and volume.
Disabled entries
On loading a task or clicking one of the listed items, the program will check
wether the associated directory still exists. For example, it could have been deleted or
renamed in the meantime, or is a disconnected external drive. Such a
directory will be disabled in the list and displayed in gray.
To prevent the selection settings
from being changed, it is no longer clickable. As soon as the
directory becomes available again, the item will be enabled again automatically.
If you want to remove from the task all directories no longer available, use
the item from the associated
context menu.

Order of entries

Clicking the left button will rearrange the directories to be backed up into an
alphabetical order. Clicking one of the other buttons will move the selected entry
one row up or down.
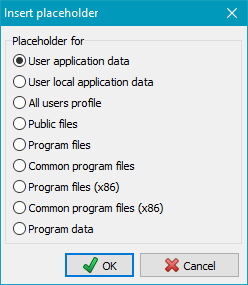
Clicking the button
at the top on the right will open a dialog box. All placeholders are in the format
"%sss%". These will be replaced with current values on backing up
(see screenshot on the right):
- %perspath% - Path to the My Documents user directory
- %apppath% - Path to the Application Data (..\AppData under Windows 7) user directory
- %profile% - Path to the user profile
(e.g. C:\Users\<Name> under Windows 7)
- %desktop% - Path to the user desktop folder
- %favorites% - Path to the user favorites folder
- %progfiles% - Path to the programs folder depending on the running version
of Personal Backup: the 32-bit version returns C:\Program Files on 32-bit systems
and C:\Program Files (x86) on 64-bit systems, the 64-bit version
returns always C:\Program Files
(e.g. C:\Program Files)
- %progpath% - Path to the Personal Backup program installation folder
- %username% - Name of the logged-in user
- %computername% - Name of the computer
 |
Other environment variables: |
Windows Vista/7/8/10 |
Windows XP |
| |
%appdata% |
C:\Users\<username>\AppData\Roaming |
C:\Documents and Settings\<username>\Application Data |
| |
%localappdata% |
C:\Users\<username>\AppData\Local |
not available |
| |
%allusersprofile% |
C:\ProgramData |
C:\Documents and Settings\All Users |
| |
%public% |
C:\Users\Public |
not available |
| |
%programfiles% |
C:\Program Files |
C:\Program Files |
| |
%commonprogramfiles% |
C:\Program Files\Common Files |
C:\Program Files\Common Files |
| |
%programfiles(x86)% * |
C:\Program Files (x86) |
C:\Program Files |
| |
%commonprogramfiles(x86)% * |
C:\Program Files (x86)\Common Files |
C:\Program Files\Common Files |
| |
%programdata% |
C:\ProgramData |
not available |
* only available on 64-bit systems
If you want to back up files from a removable drive (e.g. a USB stick) you cannot
be certain that the same drive letter will always be assigned. In such a case, using
file synchronization on backup may result in loss of data in the backup directory.
To prevent this, the program saves the volume name (if assigned) with any directory
to be saved and located on a removable drive when creating a new task.
So it is strongly recommended
to assign a unique volume name to any used removable drive. Right-clicking on a drive
in for example Windows Explorer and selecting Properties will allow you to do so.
Before a backup starts, the program checks whether this drive is present.
If not, the backup will be canceled.
Note: If the backup method is set to Separate directories for drives,
the name of the root directory at the destination will be generated from the
volume name (e.g. G:\Backup\Data-1\.. for volume called Data-1) instead
of using the drive letter (e.g. G:\Backup\DrvK\..) as applied for fixed drives
(see more).
To remove a directory from the task list, click on the
 button. Optionally, also all files backed up from this directory can at the
same time be deleted from the backup task destination.
button. Optionally, also all files backed up from this directory can at the
same time be deleted from the backup task destination.
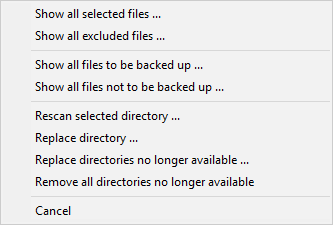
Right-clicking the list of selected directories will open a context menu
with several preview options
- Show all selected files: Show all files that are
selected for backup using the current
filter settings. Which of these files really
will be backed up will be decided later, on performing the backup.
- Show all excluded files: Show all files that are excluded
from the backup using the current filter settings.
- Show all files to be backed up: This item is only available
if solely files with the archive bit set
should be backed up. All these files will be displayed.
- Show all files not to be backed up: This item is only available
if solely files with the archive bit set
should be backed up. All files with this bit not set will be displayed.
In the program bottom window you can make more detailed selections for
Advanced settings
In most cases you can use the default settings for a backup, but the more
experienced user may prefer to configure the many individual options.
- Backup destination: In separated files or in zip file(s).
- Backup mode: Update (using timestamp or archive bit) or
configured as an alternating schedule (full and differential or incremental).
- File processing: Copy as-is, or use compression
and/or AES encryption.
- Options: Copy alternate file streams,
document summaries, file permissions, verify backed-up files, etc.
- Synchronization: Delete from the backup
destination files that no longer exist at the source.
- Security backup: Older versions of files are renamed
instead of being deleted (with a definable number of previous versions).
- Mail delivery: Automatic mail delivery after backup with status
and optional log.
- External programs: Execute any external program
or script before and/or after a backup.
At the top of the program center window, key information about the current task is displayed:
- Name of task
- Total number of files and the storage capacity required for
these (before compression)
- Time and date when last backed up
To accelerate the loading of a task, the number of files, the required storage
capacity and the type list for the selected directories are not all updated immediately.
By default, only the first directory will always be scanned for new files. You can
uncheck the option Scan directories in the dialog called from
Preferences ⇒ Program start ...
in the main menu to disable any scan after opening a task.
In this case, a scan is started not before one of the directories to be backed
up is left-clicked.
There can be many different reasons for errors that arise during a backup.
After each backup, the status windows will display whether errors occurred and
how many. Detailed information about errors will be found in the log file.
If a file could not be copied due to an error, its previous version will in
any case be retained at the destination.
Load a saved task (.buj file) for editing
or execution.
Clicking this button will open the task menu that contains a list of up to 15
of the most recently-opened tasks. Click within the list to load a task.
Right-clicking the icon will allow the list to be edited.
You should save your backup tasks to disk for future use as a file with the extension .buj.
When starting the program for the first time, a task directory is created
at "My Documents\PersBackup". You can change this location using Preferences
⇒ Directories in the main menu.
The backup tasks are saved as readable ASCII files, but modifying such a file
manually with a text editor is not recommended. Instead, edit the task within
the "Personal Backup" program.
Note: provided that a task has not been changed, this button will remain grayed out.
An existing or edited task can be saved under a new filename.
The directories to be backed up in an existing task can be added to the list
of directories of the currently-opened task. The global settings (destination
directory, backup mode etc.) of the opened task remain unchanged.
A dialog will open for selecting the directories to be backed up from which a new task
is to be created. The global settings (destination directory, backup mode etc.)
will be inherited from the opened task.
- Backup task
- New - Create new backup task
- Open ... - Open saved task from
the directory of the last opened task
- Open from task directory ...
- Open saved task stored from the selected task directory
- Save - Save a modified task
- Save as ... - Save task under
new name
- Reset counter ... - Reset the backup version counter to 1
- Import ... - Import directories to be backed up from saved task
- Export ... - Save as a new task an individual
directory from an opened task
- Recently-opened tasks ... - List of recently-opened tasks
to facilitate reopening
- Actions
- Start backup ... - Start the current
backup task
- Add directory to task ... -
Select a directory to be backed up and add to task
- Verify backup ... - Using the settings of the currently opened backup task
a guide, the dialog for backup verification will be displayed. You can edit the settings
and start the verification of files.
- Scheduled Tasks
- Add current backup task - Configure
Windows Task Scheduler to perform the currently-loaded backup
- Edit scheduled task - Select a
backup task performed by Windows Task Scheduler and edit the schedule.
- Create desktop shortcut
- for current task ...
- Create a shortcut to the currently-opened backup task on the computer desktop.
Double-clicking this shortcut will immediately start the backup.
- for several tasks ...
- Create a shortcut to several selected backup tasks on the computer desktop.
Double-clicking this shortcut will automatically perform these backups one after
the other.
- Logs
- Current log
- Show ... - Display and optionally print the log
of the currently-opened backup task
- Delete ... - Delete the log of the currently-opened backup task
- Show other ... - Display and optionally print a saved log
- Default size - Change the size of the main and its child windows to the
default values
- Update view (Function key F5) - Update the task view (count all files
and calculate the volume to be backed up) and the directory view
- Help
- Overview - Brief summary
- Backup - Editing a backup task
- License - User license
- Version - Version info
- Changelog - Information on version history
- References - Information on components used from other authors
-
Homepage - Homepage of Personal Backup
-
Donate - Make a donation to Personal Backup
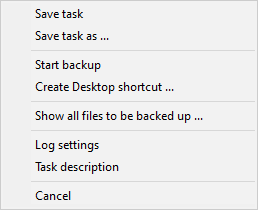
A right-click on certain areas of the desktop opens one of the following context menus.
|
- Save task
- Save current task to disk
- Save task as ...
- Save current task as new file to disk
- Start backup ...
- Start current backup task immediately
-
Create desktop shortcut ...
- Create a desktop shortcut for starting the currently-open backup task
- Show all files to be backed up ...
- This item is only available when only files are to backed up having the
archive bit been set or the backup is made to zip files.
Show all files in the selected directory and its subdirectories that would be
backed up currently.
- Log settings ...
- Settings for the backup log
- Task description
- User's description for the backup task
|

|
- Cut selected text - The marked text in the destination field
will be copied to the clipboard and then deleted.
- Copy selected text - The marked text in the destination field
will be copied to the clipboard.
- Paste from clipboard - Text from the clipboard will be inserted into the
destination field.
- Delete selected text - The marked text in the destination field
will be deleted.
- Remove current list item from list
- The selected destination directory will be removed from the internal
list of recently-used directories.
- Clear whole list
- The internal list of recently-used directories will be deleted entirely.
|
|
- Show all selected files ...
- Show all files in the selected directory and its subdirectories that are
selected for backup using the current filter settings
- Show all excluded files ...
- Show all files in the selected directory and its subdirectories that are
excluded from backup using the current filter settings
- Show all files to be backed up ...
- This item is only available when only files are to backed up having the
archive bit been set or the backup is made to zip files.
Show all files in the selected directory and its subdirectories that would be
backed up currently.
- Show all files not to be backed up ...
- This item is only available when only files are to backed up having the
archive bit been set or the backup is made to zip files.
Show all files in the selected directory and its subdirectories that would
not be backed up currently.
- Rescan selected directories ...
- The selected directory will be scanned to update file count and volume.
- Replace directory ...
- The directory selected to be saved will be replaced by another. The new
directory can be selected using a dialog. All other settings for this entry will
remain unchanged.
This option can also be used if the name of an external volume has changed.
The directory entry will be updated automatically.
- Replace directories no longer available ...
- Directories not available when loading the task (because they have been deleted
or renamed, for example) are disabled and displayed in gray. Select this menu item
to replace them by other existing directories. All other settings for these entries
will remain unchanged.
- Remove all directories no longer available
- Directories not available when loading the task (because they have been deleted
or renamed, for example) are disabled and displayed in gray. Select this menu item
to remove them from the currently-loaded task.
|

|
- Show files of subdirectory ...
- All files located in the selected subdirectory will be displayed. This is
very useful for checking whether there are any files that should or should
not be backed up.
- Show all selected files ...
- Show all files that are are selected for backup using the current filter settings
- Show all excluded files ...
- Show all files that are excluded from backup using the current filter settings
|
|
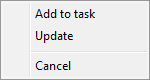
- Add to task -The selected
directory will be added to the backup task.
- Update - Update directory tree.
|
J. Rathlev, 24222 Schwentinental, Germany, February 2023