


The control panel is a new feature introduced with Version 6 and will inform you
about all your configured backup tasks and the associated time schedules for
automatic backups in a clearly-arranged form. In addition, you can edit time schedules,
configure backups using Windows Task Scheduler as well as call additional tools
for restore and verification of backed-up data and to clean up backup directories.
You can select the desired function by clicking the buttons on the tool bar on
the left of the window. On the right, the associated details will be
displayed.

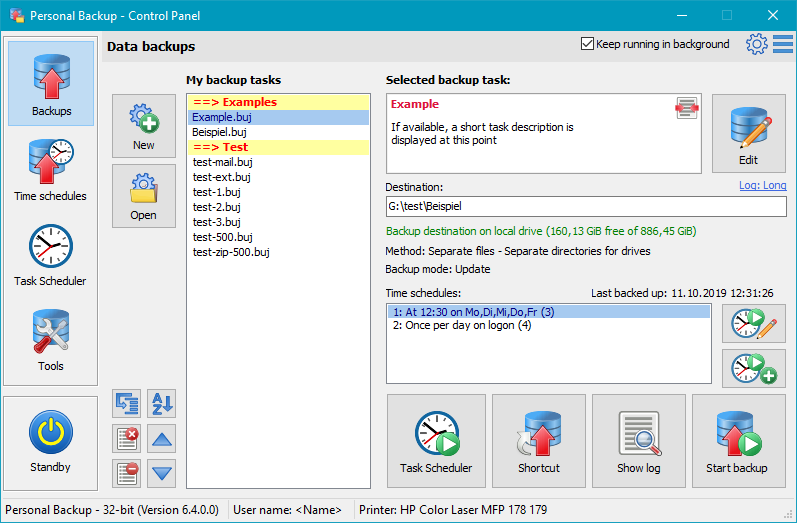
All user-configured backups are displayed as a list.
Display in normal mode
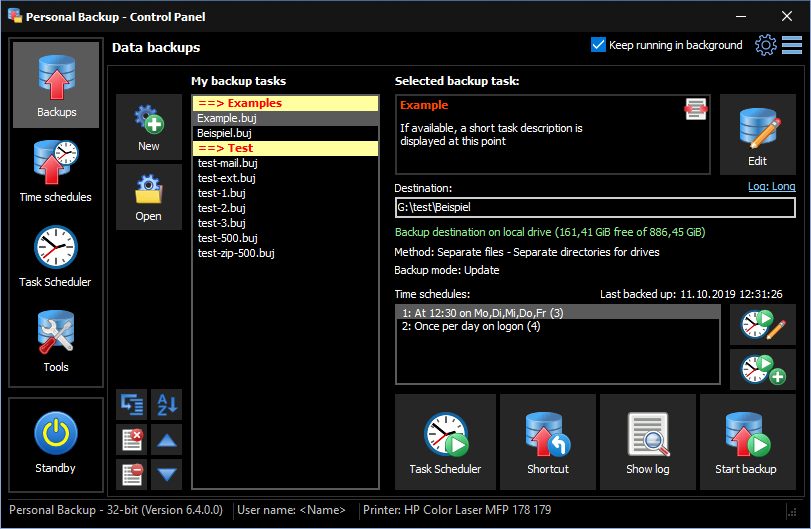
Display in dark mode
Display in plain mode

The list My backup tasks shows all tasks created by the user.
Using the buttons New and Open (to the left)
you can add a new backup task or an
already-saved task to the list. Clicking on a list entry
will show the associated details on the right:
- Name of task (highlighted in red)
- To the right small icons are signaling the most important settings of the selected backup task:
 The files will be compressed on backup.
 The files will be encrypted on backup.
 The files will be compressed and
encrypted on backup.
The files will be compressed and
encrypted on backup.
 Security copies
will be created during backp.
Security copies
will be created during backp.
 External programs
will be be run before and/or after the backup.
External programs
will be be run before and/or after the backup.
 An e-mail will be sent after the backup.
 The task is registered in Windows Task Scheduler.
- Description of task (optional): Double-clicking
the text field will open a dialog to edit the description
⇒ more information.
- Settings for the backup log: clicking the log mode indicator
will open a dialog for changing the backup log settings.
- Destination directory of backups, on backups into zip archives
also the archive name
- Information about the destination and the available storage space
- Information about the selected backup method and settings for
the optional synchronization
- Information about the associated time schedules (if available)
Further information will be shown when moving the mouse over the particular field:
- Description: task file (buj file) with full path
- Destination directory: a list of
all directories to be backed up when running the selected task
Edit list of backup tasks
 Create new task: Clicking the New button will start the
wizard for creating a new backup task. This
will be inserted as a new entry at the beginning of the list.
Create new task: Clicking the New button will start the
wizard for creating a new backup task. This
will be inserted as a new entry at the beginning of the list.
 Add tasks to list: Clicking the Open button will provide
access to one or several backup tasks already saved as
buj files to the list.
Add tasks to list: Clicking the Open button will provide
access to one or several backup tasks already saved as
buj files to the list.
 Edit task: To edit the properties of the selected backup task, click the button at the top right.
A dialog will open where you can, for example, add other
directories for backup or modify the file selection or any
other setting.
Edit task: To edit the properties of the selected backup task, click the button at the top right.
A dialog will open where you can, for example, add other
directories for backup or modify the file selection or any
other setting.

Remove all entries from list:
Clicking the button will delete all entries from the list. In so doing, only the list entries but
not the task files themselves will be deleted. At any time, you can add a saved task file
back to the list again by clicking the
Open button.

Remove selected entries from list:
Clicking the button will delete the selected entries from the list. In so doing, only the list entries but
not the task files themselves will be deleted. At any time, you can add a saved task file
back to the list again by clicking the
Open button.


Change order: Clicking one of these buttons
will move the selected entry or entries (even several) one position up or down.
In this way, it is possible to arrange the tasks according to their properties
(such as the destination directory).

Insert comments: To improve visibility, you can
insert comment lines into the list. In so doing, the backup tasks can be arranged
for instance by themes. Each group will be provided with color-highlighted headers.

Sort alphabetically: Clicking this button
will sort the list alphabetically. If
comment lines have been added to the entries,
as described above, they will be retained and the resulting groups will be sorted
section by section.
Time schedules

On the right of the list showing the time schedules associated
with the selected task you will find two buttons to configure these. Clicking the upper button will
show the details of the selected schedule (here: 2: On logoff ...) for editing,
whereas clicking the lower button will add a new additional schedule associated with the selected
task ⇒ more information.
Other functions
 Task scheduler: The currently-selected backup tasks will be
added to Windows Task Scheduler
to be performed automatically according to the specified time schedule. If this
task is already registered. the time schedule can be edited
⇒ more information.
Task scheduler: The currently-selected backup tasks will be
added to Windows Task Scheduler
to be performed automatically according to the specified time schedule. If this
task is already registered. the time schedule can be edited
⇒ more information.
 Shortcut: A shortcut on the computer desktop for the currently-selected
backup tasks (even several) will be created. By single double-clicking thereon these backups will
be started automatically one after another. In addition, you can specify a subsequent
action like shutting down the system
⇒ more information.
Shortcut: A shortcut on the computer desktop for the currently-selected
backup tasks (even several) will be created. By single double-clicking thereon these backups will
be started automatically one after another. In addition, you can specify a subsequent
action like shutting down the system
⇒ more information.
 View log: A viewer window will
open to show the log file belonging to the
currently-selected backup task. You can inspect the log and print it if required.
View log: A viewer window will
open to show the log file belonging to the
currently-selected backup task. You can inspect the log and print it if required.

Start backup: Depending on how many backup task are selected in the list,
the further procedure is different:
- One selected task: The selected backup will be
started instantly. The Control Panel remains locked
until the backup has finished. During backup the user can select an action
(e.g. shutdown) to be performed after backup
(see here).
- Several selected tasks: A dialog will open in which you can select whether
the selected backup tasks should run one after the other or in parallel in the background.
In the latter case, the control center remains operable, so that further backups
can also be started. However, there is no option to select a subsequent action,
such as shutdown.

This item brings together the functions for restore, verification and cleanup of files
which can optionally also be saved as task files. When selecting a particular function, a list of
the associated tasks that were created and saved by the user is shown.
In addition, similar to the backup tasks (see above), the details
of the selected task are displayed on the right.

Restore files
A summary of all user-configured restore tasks is displayed.
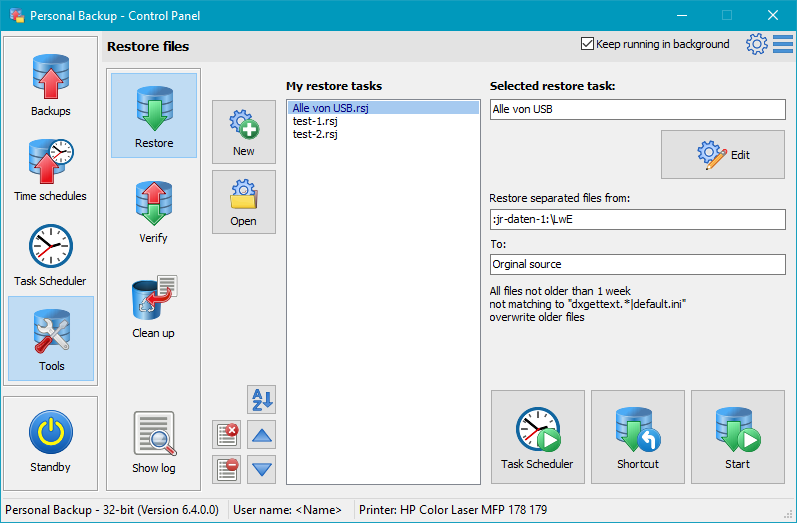
Using the buttons New and Open (to the left of
My restore tasks) you can add a new restore task or an
already-saved task to the list. Clicking on a list entry
will show the associated details on the right:
- Name of restore task (the full path of the task file will be shown when moving
the mouse over the field)
- Directory to which the data was backed-up
- Directory to which the data is to be restored
- Information about file selection
Using the buttons below to the left, you can change the order of the entries and
delete selected or all entries from the list. In so doing, only the list entries but
not the task files will be deleted. At any time, you can add a saved task file
to the list again by clicking the Open button.
To edit the selected restore task, click the button at the top right. A
dialog will open where you can change the settings
for this task.
Notes on creating a new restore: When clicking the New button,
the important settings for the restore, such as backup directory, settings for
compression and encryption and the backup method, will be predefined as specified in the
currently selected backup task. The user need only specify
where to restore (to the original or to any
other directory), if all files or only those of a specified age are concerned and if files
already existing shall be overwritten. You will find more information in the
detailed description.
Below you will find buttons for the following functions:
- Task scheduler: The selected restore task will be added to Windows Task Scheduler
to be started automatically according to the specified time schedule
⇒ more information.
- Shortcut: A shortcut will be created on the computer
desktop for the currently-selected restore task. Thereafter the associated restore will
be started immediately by double-clicking this desktop icon.
- Start restore: The selected restore will be
started instantly.

A summary of all user-configured verify tasks is displayed.
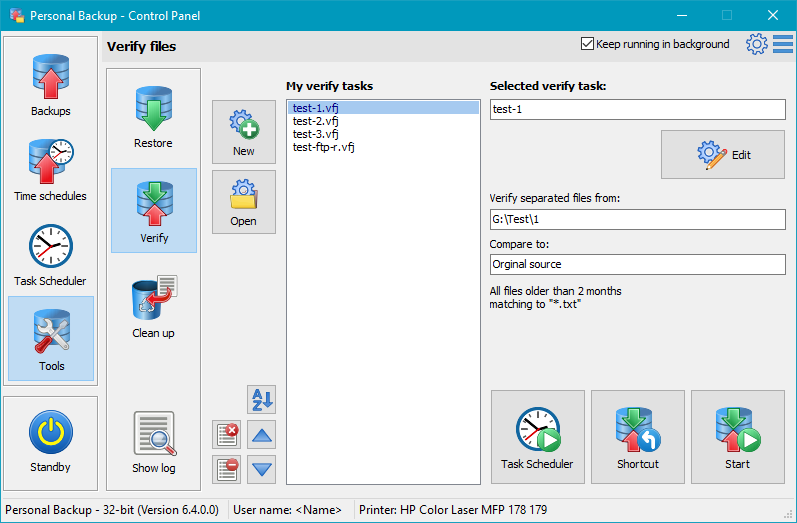
Using the buttons New and Open (to the left of
My verify tasks) you can add a new verify task or an
already-saved task to the list. Clicking on a list entry
will show the associated details on the right:
- Name of verify task (the full path of the task file will be shown when moving
the mouse over the field)
- Backup directory selected for verification
- Directory to be used for comparison
- Information about file selection
Using the buttons below to the left, you can change the order of the entries and
delete selected or all entries from the list. In so doing, only the list entries but
not the task files will be deleted. At any time, you can add a saved task file
to the list again by clicking the Open button.
To edit the selected verify task, click the button at the top right. A
dialog will open where you can change the settings
for this task.
Notes on creating a new verification: When clicking the New button,
the important settings for the verification, such as backup directory and the backup method,
will be predefined as specified in the currently selected backup task.
The user need only specify how to verify (comparison with the original or any other
selected directory) and if all files or only those of a specified age are concerned.
You will find more information in the detailed description.
Below you will find buttons for the following functions:
- Task scheduler: The selected verify task will be added to Windows Task Scheduler
to be started automatically according to the specified time schedule
⇒ more information.
- Shortcut: A shortcut will be created on the computer
desktop for the currently-selected verify task. Thereafter the associated verification will
be started immediately by double-clicking this desktop icon.
- Start verify: The selected verification will be
started instantly.

A summary of all user-configured cleanup tasks is displayed.
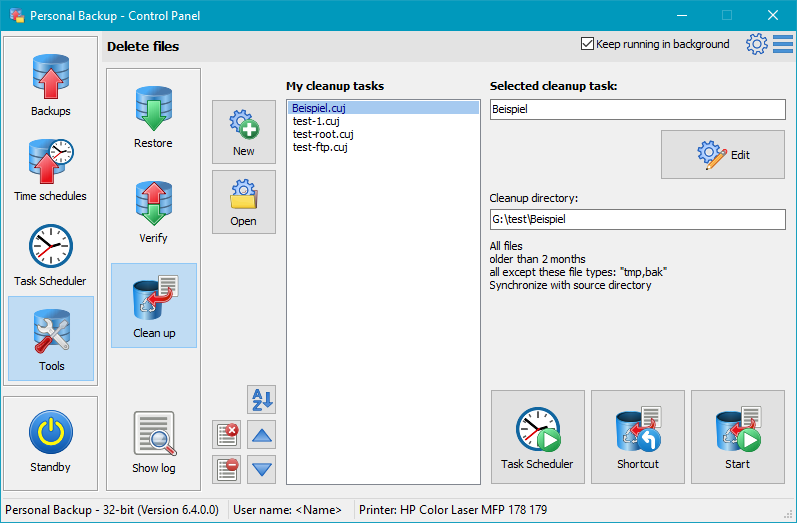
Using the buttons New and Open (to the left of
My cleanup tasks) you can add a new cleanup task or an
already-saved task to the list. Clicking on a list entry
will show the associated details on the right:
- Name of cleanup task (the full path of the task file will be shown when moving
the mouse over the field)
- Directory selected to be cleaned up
- Information about file selection
Using the buttons below to the left, you can change the order of the entries and
delete selected or all entries from the list. In so doing, only the list entries but
not the task files will be deleted. At any time, you can add a saved task file
to the list again by clicking the Open button.
To edit the selected cleanup task, click the button at the top right. A
dialog will open where you can change the settings
for this task.
Notes on creating a new cleanup task: When clicking the New button,
the important settings for the cleanup, such as backup directory,
will be predefined as specified in the currently selected backup task.
The user need only specify whether he wants to delete files as result of a synchronization
with the original or any other directory or if he wants to delete all files matching
to special filter conditions, such as text patterns and/or age.
You will find more information in the detailed description.
Below you will find buttons for the following functions:
- Task scheduler: The selected cleanup task will be added to Windows Task Scheduler
to be started automatically according to the specified time schedule
⇒ more information.
- Shortcut: A shortcut will be created on the computer
desktop for the currently-selected cleanup task. Thereafter the associated cleanup will
be started immediately by double-clicking this desktop icon.
- Start cleanup: The selected cleanup will be
started instantly.
A viewer window will open
to show the default log file.
Clicking the appropriate button will print out or delete the log file. Additionally,
you can search for the beginning of a backup section (blue arrows),
backup errors (red arrows) or any other text. To copy the whole text to the clipboard,
no text selection is required. For part of the text, select
a section and type Ctrl+C or Ctrl+Ins on your keyboard.
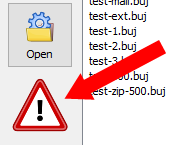
If errors have occurred during an automatic backup, a warning symbol is displayed
in the control center. By clicking on it, the error log
can be displayed to obtain further information. If the program is running in the
background, the icon in the Windows notification area
 also changes to red.

When you exit the program, all preferences including your selections for automatic
backup will be saved.

Move program to background
If at least one of the options for
Automatic backups on logoff or at time of day
is selected and/or Show icon in notification area is checked,
the program will remain running in the background and an icon
will appear in the Windows notification area (see below).
If at least one of the automatic 16 tasks is activated as time controlled or at logoff,
this box will be checked by the program and the Personal Backup will not be
terminated when closing the main window, but will continue running in the background. An
 icon will then be
displayed in the Windows notification area (usually at the bottom right-hand
corner of the screen). Under Windows 7 and newer this icon may initially be hidden, in
which case click the arrow adjacent to the notification area to view all hidden
icons. To show the icon permanently (recommended), click on the icon and drag it from the
hidden list to the notification area.
icon will then be
displayed in the Windows notification area (usually at the bottom right-hand
corner of the screen). Under Windows 7 and newer this icon may initially be hidden, in
which case click the arrow adjacent to the notification area to view all hidden
icons. To show the icon permanently (recommended), click on the icon and drag it from the
hidden list to the notification area.
Furthermore, the program adds a shortcut to the startup folder of the Windows start menu
to be started automatically on next user logon if at least one automatic task
(time-triggered or on logon/logoff) is active. If the user is logged on as administrator
and at least one automatic task is using a Volume Shadow Copy,
in addition the Run as administrator flag of this link will be set.
Left-clicking the icon in the notification area will show a
list of all pending automatic backups,
right-clicking it will call a context menu
from which one of several actions can be initiated (e.g. backup, logoff).
Clicking this checkbox will change the program behavior:
- Checked: The program remains running in the background after closing the main
window even if no time schedule is configured. A backup can be started manually using
the right-click context menu of
the icon.
- Unchecked: All automatic tasks will be temporarily
disabled. If the main window is closed, the program will be terminated. You must
restart the program manually to reactivate the configured automatic tasks.
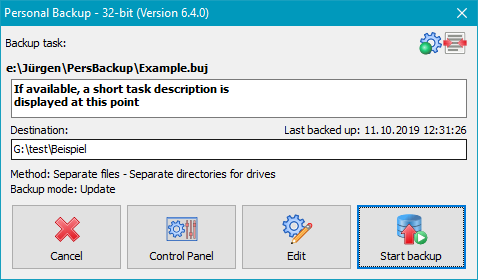
After double-clicking a saved task file, this dialog will be shown. By clicking one of the
buttons, the user can select whether he wishes to open the Control Panel, edit the task
or start the associated backup immediately. At the same time, information on
the respective backup task is displayed:
- The most important settings for the selected backup are displayed at the top right
using small icons. Additional information can be obtained by moving the
mouse over the icons (see also).
- Description of the task (if available)
- Destination directory of the backup, also the name of the archive when backing up to zip archives.
If you move the mouse over this field, all selected directories to be backed up are also displayed.
- Backup mode of the task (Update, full, differential or incremental)
- Information about the selected backup method and any settings for synchronization


- Configure backup schedules -
Launch the add-on program PbPlaner,
to configure alternating backup schedules using Windows Task Scheduler.
- External Restore program
- Restore files -
Launch the add-on program PbRestore
to select single files from
backup (even when compressed and encrypted) for restore to any location.
- Restore from zip archive -
Launch the add-on program PbRestore
to restore files from a zip archive in which also archives with encrypted filenames are
supported.
- Start Backup under different account -
Launch the add-on program PbStarter
to configure backups so that they will be started under a different user account.
This is good way to protect the backups from manipulation by malware.
- Thunderbird mail backup -
Launch the add-on program TbBackup
to help less-experienced Thunderbird users to backup and restore their mail data.
- Backup files from a portable device -
Launch the add-on program DeviceBackup,
which can be used to back up data from a mobile device (e.g. Android smartphone).
- Real-time backup of data -
Launch the add-on program PbWatchdog
to start backups of selected directories automatically in background after
changes are recognized.
- User defined utilities -
You can add any program to the list,
for example a Text Editor or a File Manager.
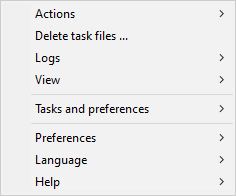
- Actions
- Manage backup tasks
- Configure backup time schedules
- Use Windows Task Scheduler
- Start selected backup tasks
- Edit selected backup task
- Create new backup task
- Create new Thunderbird backup
- Restore files from backup
- Verify backed-up files
- Clean up backup directory
- Close Personal Backup
- Delete task files ... -
Over time, more and more tasks for backup, restore, cleanup and verify will be
accumulating. They are stored in the
task directory as
files using the extensions buj (Backups), rsj
(Restores),
cuj (Cleanups) and
vfj (Verifications).
Depending on the active function in the tool bar at the left, you can select the
appropriate task files in a dialog and delete them.
- Logs
- Selected task
- Show log ... - Display and optionally print
the log file of the currently selected backup task
- Delete log ... - Delete the log file of the currently selected backup task
- Show other log ... - Select and display any log file
- Show error log ... - Display the list of failed backups
- Delete old log files ... - Delete all log files from the current log directory
older than an adjustable fixed date or older than a selectable number of
days, weeks, months or years relative to the current date.
- FTP communication log (see here)
- View ... - Display the FTP communication log file
- Delete ... - Delete the FTP communication log file
- Mail delivery log (see here)
- View ... - Display the mail delivery log file
- Delete ... - Delete the mail delivery log file
View
Set to default position - Position the Control Panel window into the upper left corner of the screen
Set to default size - Change the size of the Control Panel window to the default values
Tasks and preferences
Export - The current settings and all tasks for backups,
restores, verifications and clean ups are exported to a zip archive.
This should preferably be stored on an external data carrier, e.g. a USB stick.
Import - Import the settings and tasks saved via the
above mentioned export function, e.g. to use them on a new PC.
Preferences
View ... - View settings
Start program ... - Settings for program start
Shutdown ... - Settings for backups on shutdown
Copy options ... - Basic settings for copying files
Security copies ... - Presets for security copies
Log file ... - Log settings
Printer ... - Settings for printing the log
Directories ... - Selection of the directories used by the program
Other ... - Other settings
Language - Selection of the user language
Default - Use the system default language
English
German
Dutch
French
Hungarian
Italian
Polish
Portuguese
Russian
Spanish
Turkish
Ukrainian
Chinese
Help
Overview - Brief summary (F1)
Context-sensitive help - depending on the selected function (F2)
- Data backup - Configuration of a backup task
- Backup time schedules
- Windows Scheduled Tasks
- Restore files
- Verify files
- Cleanup directories
License - User license
Version - Version info
Changelog - Information on version history
References - Information on components used from other authors
Check for update ...
- A connection to the Internet will be established to check if a new update is available
(details).
Homepage - Homepage of Personal Backup
Download - leads directly to the download page of Personal Backup
J. Rathlev, 24222 Schwentinental, Germany, April 2026