|
|
|
Click the Task settings tab to configure your backup task:

Different arrangements for storing your backups are used at the destination. If a schedule has been configured as an automatic backup, depending on the cycle a directory named BDnn for a daily schedule or BWnn for a weekly schedule will be created above the directory structure described below.
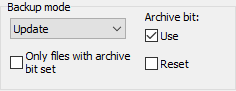
You can select four different backup modes:
Important notes:
The Full, Differential and Incremental modes are only available with backups into single files. The destination directory will always be deleted before backup. So they must be used in combination, for example as follows:
Restoring data from such an alternating schedule becomes very simple with the additional program PbRestore. Using this tool, you can automatically restore the latest version of each file relative to a given date.
To prevent loss of data when using the incremental or differential mode, the destination directory will be deleted only if the most recent backup did not occur on the same day.
Using the Automatic backup function of the program, you can use preconfigured scheduled backups. To perform such a backup using Windows task scheduler, you will have to create several backup tasks which differ in mode (e.g. Full and Differential) and destination directories. Let these tasks run at the desired times (e.g. Full on Monday, Differential on other days - more information).
The "normal user" might prefer the Update mode to be sure that all current versions of all files will be backed up and are retained in the destination directory. Old files no longer existing at the origin will not be deleted from the destination unless the option synchronize is selected.
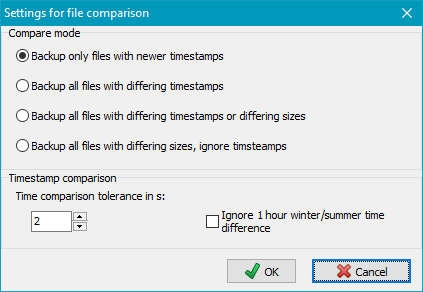
Compare mode: Select which criteria shall be used to decide whether a file is to be backed up or not. Usually (default setting), the timestamps (last write time) of the files are to be compared. For special cases you can select different criteria. The following settings are possible:
Size comparison: The two options mentioned above using a size comparison are only available on backups via FTP if neither compression nor encryption is enabled. However, backups to a local or network directory can use these options also in combination with compression and encryption.
Timestamp comparison: Comparing the timestamps of files is problematic when using different file systems (e.g. FAT32 and NTFS) at source and destination. The timestamps have the following characteristics:
To be system-independent, a default tolerance of 2 s on time comparison is used
by the program. If necessary this tolerance can be adjusted by the user.
A further problem is that FAT systems use local time
whereas the other systems use UTC, hence when
backing up from an NTFS partition to a FAT32 partition, there will be time shifts
after changing from normal to daylight saving time. On the first backup after a
time change, all files would be copied even if they have not been modified because
the local time would be one hour in front, which simulates a change. As a workaround,
you can allow a difference of one hour plus tolerance.

| Source directory | Zip file | Zip file using placeholder %date% |
| E:\Data\Dir1 E:\Data\Dir2 K:\ |
Dir1.zip Dir2.zip DrvK.zip |
Dir1-2019-12-21.zip Dir2-2019-12-21.zip DrvK-2019-12-21.zip |
In all cases, a maximum size can be specified (e.g. 250 MB). This will cause the zip archives created during backup to be split into several files of the given size. You can select one of the predefined sizes or enter any other size value (at least 64 KiB) manually, eg. 500 MB. The unit suffixes used must follow the recommendations of the IEEE (see here)
Note: Bear in mind that zip files will always be created
anew at the start of each backup operation. An already-existing zip file
with the same name will be overwritten. There is no comparison of timestamps in
this mode (see above under Update).
If the directories to be backed up reside on different drives,
of the above methods only the following are allowed:
Single files + Separate directories for drives
or Zip files + Separated by drive and subdirectory. The other methods can
produce ambiguous results, so if you wish to use these, you should configure
separate backup tasks for each drive.
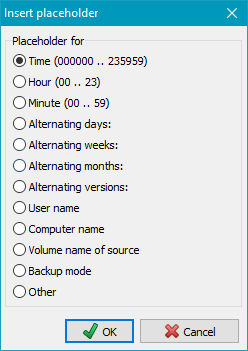
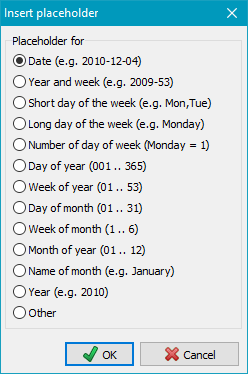
The name of a zip file may contain placeholders which will be replaced with current
values on backing up. To insert these, click the
![]() ) button:
) button:
As with single files (see here) you can also use the archive bit to decide if a file has to be backed up. If the checkbox Use archive bit is selected, only files having the archive bit set will be added to the zip file. Optional, the archive bit will be reset thereafter if the appropriate checkbox is selected.
To save space, a compression can be used by the program for backing up into
single files. There is a choice between
zip and gz
file format. Files created by using one of these methods are compatible with all
standard archive programs (e.g. WinZip and 7-zip). Zip files can also be opened with
Windows Explorer.
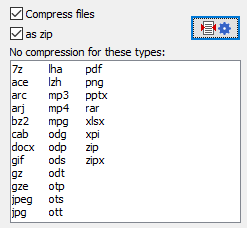
Many file formats (such as pdf, docx and jpg) are themselves compressed.
Compressing these files further saves no noteworthy disk space. Select which file types you do not
want to be compressed in this task by clicking the
![]() button.
The default settings can be specified in the dialog called from
Preferences ⇒ Copy ...
in the main menu.
button.
The default settings can be specified in the dialog called from
Preferences ⇒ Copy ...
in the main menu.
Differences between backing up as zip or gz files:
If necessary (e.g. if you want to have a 1:1 copy of your data) the compression can be disabled completely by deselecting the check box Compress files.
All files may be encrypted using the Advanced Encryption Standard (AES) method,
the algorithms of which are known to be very secure
(more
information). You can use it on single files using a
proprietary file format or on zip files with a
WinZip-compatible
file format.
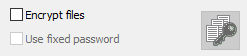
 It is possible to specify a fixed password for the encryption. This will be
stored as an encrypted string in the task file. For even higher security, you
should not use this option but enter the password each time manually when
starting the backup.
It is possible to specify a fixed password for the encryption. This will be
stored as an encrypted string in the task file. For even higher security, you
should not use this option but enter the password each time manually when
starting the backup.
Important notes: The used password should be kept in a safe place, as it is not possible to restore the files encrypted during the backup without this password. Once a password has been chosen for a backup task, it should not be changed, because then the new files to be backed up will be encrypted with the new password, but the old files already present will remain encrypted with the old password. This then inevitably leads to problems when restoring the data.
Note on the length of the password: The password is not used directly for encryption. It is converted into a pseudo-random value using the PBKDF2 method (see also RFC2898). It is not the length of the password that is important for security, but its complexity (entropy). For an encryption depth of 256 bits, passwords of 48 to 64 characters are therefore completely sufficient, depending on the diversity of the characters used. It should also be noted that the password length in WinZip and 7-zip is limited to 99 characters, i.e. encrypted archives created with Personal Backup that use a longer password cannot be unpacked with these programs.
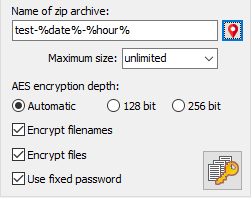
On backing up to zip archives, also filenames
and directory names can optionally be encrypted. This will prevent an unauthorized person
from deducing information about the contents either from the directory structure
or the filenames after opening an archive.
Important note: Such an archive is not fully compatible with the
WinZip format. It can still be
opened with programs like WinZip or 7zip, but the
original directory structure will not be displayed. Instead, all files and
directories are marked with a sequential hex number. On backup, the real name will be encrypted
and stored in an extra field within the local file header. To unpack this, the internal
restore function or the
add-on program PbRestore is required
to recover the original directory structure. Single files can also
be unpacked by applying the password using a program like WinZip or
7zip, but in this case the filename will not be recognizable.
Note: The setting of the encryption depth and the file format for uncompressed and gz-compressed files was changed in version 5.8.5. But restoring of files created by older versions will still be possible.
If using zip files as destination, the encryption depth is adjustable, otherwise it will be determined automatically:
| password < 16 characters | → | 128 bit |
| password ≥ 16 characters | → | 256 bit |
Since Windows XP it has been possible to create
Volume Shadow copies enabling the user to backup on the fly also files that
are locked by the system or an application.
Personal Backup supports this method optionally on backups since version 5.7.
To benefit from this, the following conditions must be met:
Only if all these conditions are fulfilled, this option will be enabled and can be
used for the backup.
Optionally (see preferences) during the creation of
the Volume Shadow Copy a log can be written into the file PbVss.log
which is located in the same directory as the ini file containing
the program settings.
In addition, the Backup Components Document Contents will always be saved
in XML format to the destination directory (refer to the information provided by
Microsoft about VSS).
Note: The internal restore function of the program does not at present support this procedure. To restore system files, you need to boot e.g. from a CD with Windows PE to ensure that the installed system is not running.
With the NTFS file system, each file has three timestamps for the date & time: Created, Modified and Accessed. By default, on backing up, the program always copies the date & time Modified. Checking the Select creation time option will also copy the date & time Created.
The NTFS file system has the capability to link additional data to a file, so called
alternate data streams.
These streams are hidden from the user in the Windows system. You will need a
special utility program, such as Streams from the
SysInternals package by Microsoft
to examine alternate data streams.
After checking this option, any such alternate data streams will be backed up
with each file.
Notes: This option is only available if both source and destination
use the NTFS file system and when backing up into uncompressed single files.
This option is not available under Windows XP.
After right-clicking any file in Windows Explorer, under Properties
you will find the Details tab. The information displayed depends from
the particular file type. With Word documents, all global information for the
document stored with the file are displayed and with JPEG images EXIF data is
shown.
With NTFS file systems, there is another possibility for storing information
in the file environment (document summary). This data is not part of the
document and is not normally copied.
To include this, you can select the option Copy document summary.
This option is, however, only available if the source and the destination uses the NTFS file
system and when backing up into uncompressed and unencrypted single files. The FAT32
file system, often used on external drives or USB sticks, does not support this
feature.
The user should check for himself whether this copy option is required.
Normally it is not necessary either for MS Office documents or for JPEG images
because all detail information is stored in the files itself.
At the moment, no applications using this NTFS feature are known to the author.
In NTFS file systems and network shares, an access control list (ACL) that specifies
the permissions for each user is associated with each file and directory.
To view and change these permissions, right-click the object, select Properties
from the menu and the Security tab.
If this option is set, the permissions associated with each file and directory will
also be copied during backup if both source and destination support this.
Check this option if you want the program to check the copied file for integrity. Depending on the backup mode, one of the following methods is used:
Important note: If this option is enabled, copying of files will be slowed
down considerably. The Windows caching will be disabled by the program in this case
to ensure that the file is stored completely on the destination data medium before the
verification will take place.
Generally it is not necessary to use this option because the security measures
applied by the system are quite enough.
If you want to be absolutely sure, you should prefer the additional function
to verify backed-up files.
After backup and, if enabled, after synchronization, the destination will be checked for empty directories. If this option box is checked (default), they will be deleted. Uncheck this box to retain empty directories.
This option will delete source files after a successful backup (Verify copied files is switched on by default). You will need this option only in exceptional cases: since the source files are deleted, be very careful before choosing it!